

Store locator वह छोटा-सा feature है जिसकी ज़रूरत हर multi-branch business को आख़िरकार पड़ ही जाती है: वह "अपने नज़दीकी store खोजें" box जो एक postcode को map पर दुकानों की छोटी, ranked list में बदल देता है। बाहर से यह मामूली लगता है, और happy path सचमुच आसान है, लेकिन एक अच्छा locator चुपचाप तीन काम बख़ूबी करता है: वह गड़बड़ location input को समझता है, branches को असली नज़दीकी के हिसाब से rank करता है, और नतीजा ऐसे map पर दिखाता है जिस पर इंसान action ले सके।
यह guide बताती है कि store locator असल में काम कैसे करता है, maps API से इसे बनाने के चार steps क्या हैं, और वे details कौन-सी हैं जो एक demo को ship करने लायक चीज़ से अलग करती हैं। इस article का हर map खुद MapAtlas API से render किया गया है।
Store Locator असल में करता क्या है
Styling हटा दीजिए तो store locator तीन stages की एक pipeline है:
- Visitor के input को geocode कीजिए। "1012 Amsterdam", "SW1A 1AA", या share की गई GPS position, सबको एक ही latitude और longitude बनना है।
- नज़दीकी stores को rank कीजिए। उस coordinate और अपनी branch locations की list को देखते हुए, एक समझदार radius के अंदर सबसे नज़दीकी वाले ढूँढिए।
- नतीजों को render कीजिए। Ranked stores को map पर markers के रूप में रखिए, हर एक अपने address, opening hours और directions के link के साथ।
नीचे का map ठीक वही तीसरा stage है, MapAtlas tiles से render किया हुआ: central Amsterdam की छह branches, visitor से distance के हिसाब से pin की हुई। यहाँ ये supermarkets हैं, लेकिन map बिल्कुल वैसा ही रहता है चाहे markers किसी POI dataset से आएँ या आपकी अपनी stores की list से।
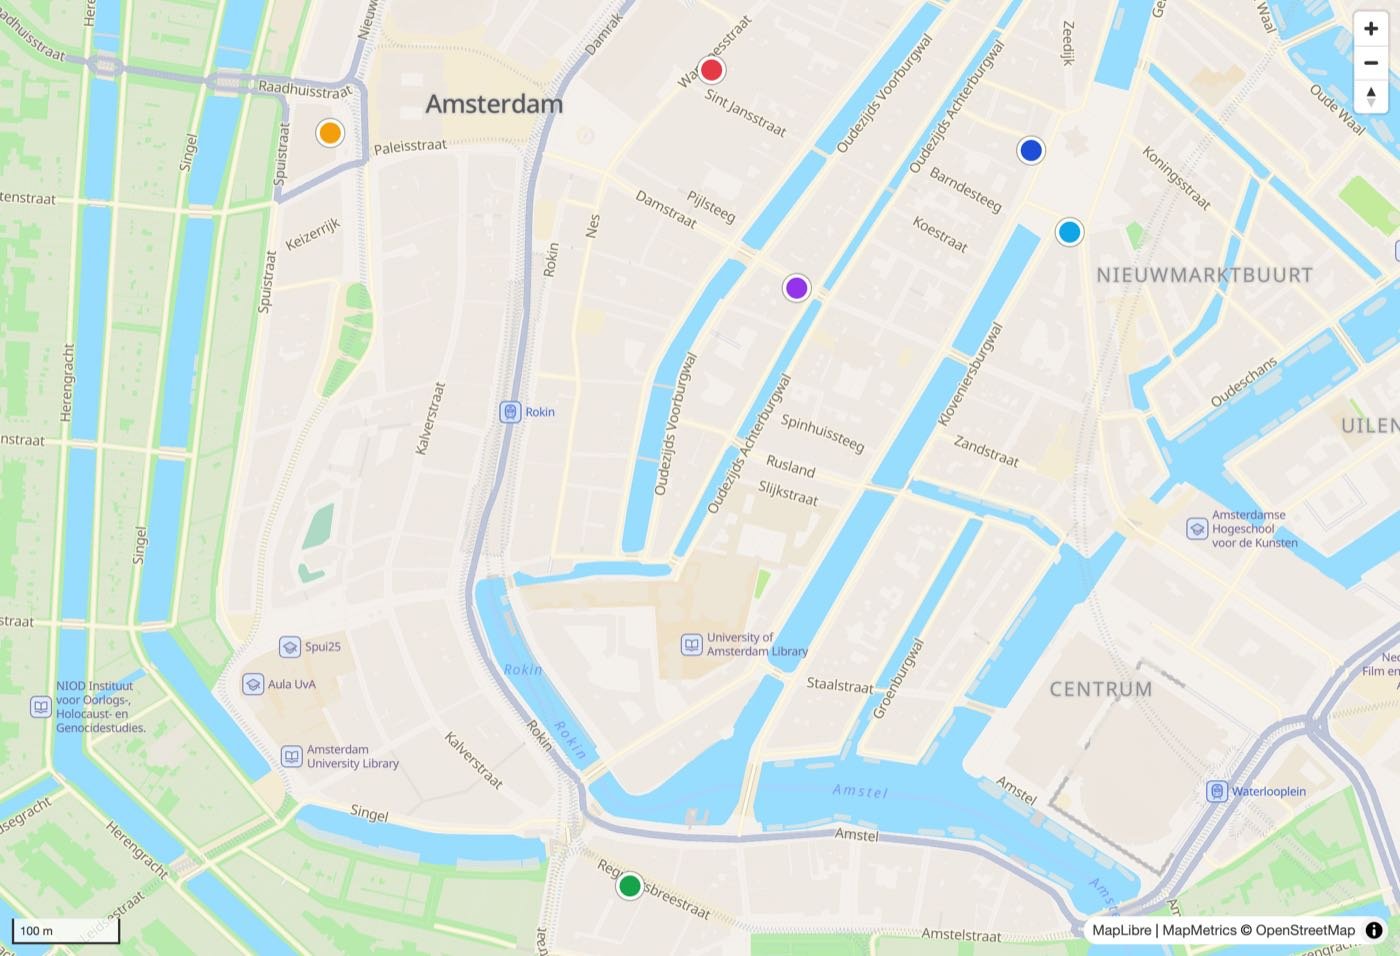
रंगों का क्रम ही ranking है। Visitor ने map के केंद्र से search किया, और markers क्रम में सबसे नज़दीकी branches हैं, सबसे पास वाली पहले।
Step 1: Visitor का Input Geocode कीजिए
Visitor एक postcode, शहर या पूरा address type करता है, और आपको एक coordinate चाहिए। यही forward geocoding है।
// Turn what the visitor types into a coordinate (autocomplete geocoding)
const res = await fetch(
  `https://gateway.mapmetrics-atlas.net/autocomplete/` +
  `?token=${API_TOKEN}&text=${encodeURIComponent(query)}` +
  `&focus.point.lat=52.37&focus.point.lon=4.89` // bias toward your service area
);
const { features } = await res.json();
const [lon, lat] = features[0].geometry.coordinates; // [lon, lat]
const label = features[0].properties.label;          // "Damrak, Amsterdam, North Holland, Netherlands"
यहाँ दो बातें मायने रखती हैं। अपने service area के पास का focus.point भेजिए ताकि "Cambridge" सही वाला resolve हो, और उस case को handle कीजिए जहाँ visitor typing के बजाय device GPS share करता है: तब coordinate आपके पास पहले से है और यह step पूरी तरह skip हो जाता है।
Step 2: अपने Stores को Distance से Rank कीजिए
अब visitor का coordinate आपके पास है। Stores खुद आपका अपना data हैं: branches की एक list, हर एक अपने latitude और longitude के साथ, जो आपके database में रहती है। उन्हें rank करना एक straight-line (haversine) distance calculation है, किसी API call की ज़रूरत नहीं:
// Your branches, each with a lat/lon. Rank by distance from the visitor.
const ranked = stores
  .map(s => ({ ...s, distance_m: haversine(lat, lon, s.lat, s.lon) }))
  .sort((a, b) => a.distance_m - b.distance_m)
  .slice(0, 6);
एक basic locator को बस इतना ही चाहिए। बड़े network के लिए आप पहले visitor के आसपास के bounding box पर filter करेंगे ताकि हर request पर हर branch की distance न नापनी पड़े, और फिर बचे हुओं को sort करेंगे। Output है सबसे नज़दीकी branches की छोटी list, हर एक अपने distance_m के साथ।
Step 3: पहले Distance से Rank, फिर Travel Time से Refine
Straight-line distance सही default है। यह तेज़ है, इसमें कोई extra call नहीं लगती, और घने network के लिए आमतौर पर सही भी होती है। लेकिन सीधी रेखा में सबसे नज़दीक दिखने वाली दुकान हमेशा सबसे जल्दी पहुँचने वाली नहीं होती: नदी के उस पार 400 मीटर दूर खड़ा store नज़दीकी पुल तक जाने में दस मिनट का चक्कर बन सकता है।
जिस locator में "नज़दीकी" का असली मतलब "सबसे जल्दी पहुँचने वाला" है, वहाँ top कुछ candidates को directions या matrix call से असली travel time पर दोबारा rank कीजिए:
// Re-rank the closest stores by real drive time (MapAtlas Matrix API)
const res = await fetch(`https://gateway.mapmetrics-atlas.net/matrix/?token=${API_TOKEN}`, {
  method: 'POST',
  headers: { 'Content-Type': 'application/json' },
  body: JSON.stringify({
    sources: [{ lat, lon }],
    targets: top3.map(s => ({ lat: s.lat, lon: s.lon })),
    costing: 'auto', // 'auto' | 'bicycle' | 'pedestrian'
  }),
});
const { sources_to_targets } = await res.json();
const row = sources_to_targets[0]; // one entry per target, each with .time (seconds)
const byTime = top3
  .map((s, i) => ({ ...s, time: row[i].time }))
  .sort((a, b) => a.time - b.time);
आप यह सिर्फ़ चंद नज़दीकी candidates के लिए करते हैं, इसलिए यह एक ही सस्ती call रहती है, हर store के लिए एक नहीं।
Step 4: Stores को Map पर Render कीजिए
आख़िरी step है map खुद। हर ranked store के लिए एक marker रखिए, address और opening hours वाला popup जोड़िए, और view को इस तरह frame कीजिए कि हर नतीजा दिखे। ऐसे maps API के साथ जो tiles, geocoding और search एक ही provider से देती है, पूरा locator end to end एक vendor और एक coordinate system पर चलता है, और इसी पर इस article का ऊपर वाला map बना है।
हर marker को ऐसा popup दीजिए जिसमें visitor को action लेने के लिए ज़रूरी सब कुछ हो: नाम, address, distance, opening hours, और एक "Directions" link जो coordinate को routing engine को सौंप दे।
वे Details जो Demo को Production से अलग करती हैं
ख़ाली नतीजे। कोई ऐसे इलाक़े से search करता है जहाँ आपकी कोई branch नहीं है। पहले से तय कीजिए कि radius अपने आप बढ़ाना है, चाहे कितना भी दूर हो सबसे नज़दीकी एक store दिखाना है, या ईमानदारी से कहना है कि "50 किमी के अंदर कोई store नहीं"।
Opening hours. जो locator बंद पड़ी दुकान को सबसे नज़दीकी option की तरह दिखाता है, वह चिढ़ पैदा करता है। Opening hours पर filter या flag कीजिए ताकि "अभी खुला है" एक first-class option बने।
अस्पष्ट input. "Cambridge" England में भी है और Massachusetts में भी; "Springfield" दर्जनों बार मौजूद है। Geocode step पर country biasing इसमें से ज़्यादातर हटा देती है, और visitor के typing करते समय autocomplete देना बाक़ी बचा हिस्सा हटा देता है।
Mobile GPS और consent. Mobile पर सबसे मज़बूत experience "मेरी location इस्तेमाल करें" button है, लेकिन device GPS पढ़ना location data है और इसके लिए consent चाहिए। पहले पूछिए, और visitor मना करे तो text input पर fall back कीजिए।
Privacy. Visitor की location उसी पल personal data बन जाती है जिस पल वह उससे जुड़ जाती है। On demand geocode कीजिए, raw coordinate store करने से बचिए, और EU-based API इस्तेमाल कीजिए ताकि location कभी EEA से बाहर न जाए। पूरी तस्वीर के लिए हमारी GDPR-compliant maps की guide देखिए।
MapAtlas के साथ Store Locator बनाना
MapAtlas आपको पूरी pipeline एक API और एक coordinate system से देता है। Geocoding API postcodes और शहरों को country biasing के साथ coordinates में बदलती है; आप अपनी branch list को उस coordinate के मुक़ाबले rank करते हैं; Directions और Matrix APIs top candidates को असली travel time पर दोबारा rank करती हैं; और Dynamic Maps tiles नतीजा render करती हैं, ठीक वैसे जैसे इस article में दिखाया गया है। चूँकि यह सब by default EU के अंदर चलता है, visitor की location EEA में ही रहती है, जिससे locator बिना किसी अतिरिक्त मेहनत के GDPR-compliant बना रहता है।
हर endpoint के पूरे request और response formats MapAtlas API documentation में हैं। Search API भी देखने लायक है अगर आप चाहते हैं कि locator visitor के आसपास सिर्फ़ आपकी branches नहीं, बल्कि points of interest भी खोजे।
Store locator एक छोटा feature है जिसके अंदर बहुत सारा ख़ामोश judgement छिपा होता है: धुँधले input को समझना, असली नज़दीकी के हिसाब से rank करना, और इस बात का लिहाज़ रखना कि location personal data है। ये तीन चीज़ें सही कर लीजिए और "अपने नज़दीकी store खोजें" box afterthought होना बंद करके आपकी site की सबसे ज़्यादा इस्तेमाल होने वाली चीज़ों में से एक बन जाता है।
अक्सर पूछे जाने वाले प्रश्न
Store locator क्या है?
Store locator किसी retail या service website पर मौजूद वह 'अपने नज़दीक दुकान खोजें' feature है। Visitor एक postcode या शहर डालता है, या अपनी location share करता है, और locator सबसे नज़दीकी branches distance के हिसाब से rank करके लौटाता है, हर एक map पर pin की हुई, अपने address, opening hours और route link के साथ। अंदर से यह तीन steps हैं: input को geocode करके coordinate बनाना, अपनी locations की list पर nearby search चलाना, और नतीजों को map पर render करना।
Store locator कैसे बनाएँ?
Store locator चार steps में बनाइए। पहला, visitor के input (postcode या शहर) को geocoding API से latitude और longitude में बदलिए। दूसरा, अपने store coordinates पर radius या nearest-neighbour query चलाकर सबसे नज़दीकी branches निकालिए। तीसरा, उन नतीजों को distance से और चाहें तो drive time से sort कीजिए। चौथा, ranked stores को map पर markers और popups के रूप में render कीजिए। ऐसा maps API जो geocoding, nearby search और map tiles एक ही provider से देता है, आपको चारों steps बिना कई services जोड़े पूरे करने देता है।
क्या मुझे store locator API चाहिए?
आपको geocoding, map tiles और आमतौर पर travel-time ranking चाहिए; store list खुद आपका अपना data है। आप कुछ दुकानों की छोटी list hardcode करके straight-line distance खुद निकाल सकते हैं, लेकिन जिस पल आपको postcode search, drive-time sorting और एक render किया हुआ map चाहिए, तब geocoding, matrix और map rendering एक ही provider से देने वाली API आपको तीन vendors को आपस में जोड़ने और उनके coordinate formats मिलाने से बचा लेती है।
Store locator नज़दीकी stores को rank कैसे करता है?
सबसे आसान ranking है visitor के coordinate से हर store तक की straight-line (great-circle) distance, जिसे बढ़ते क्रम में sort किया जाता है। यह तेज़ है और घने शहरी networks के लिए ठीक भी। बेहतर experience के लिए top candidates को directions या matrix API से असली travel time पर दोबारा rank कीजिए, क्योंकि सीधी रेखा में सबसे नज़दीक दिखने वाली दुकान हमेशा सबसे जल्दी पहुँचने वाली नहीं होती, ख़ासकर जब बीच में नदियाँ, highways और one-way systems आ जाएँ।
क्या store locator GDPR compliant होता है?
हो सकता है, और जहाँ visitor EU में है वहाँ होना ज़रूरी है। Store locator एक location process करता है, और जब location किसी user से जुड़ी हो तो वह personal data है। इसे compliant रखने के लिए visitor का coordinate store करने के बजाय on demand geocode कीजिए, EU-based maps API इस्तेमाल कीजिए ताकि location कभी EEA से बाहर न जाए, और device GPS पढ़ने से पहले consent माँगिए। MapAtlas by default location queries EU के अंदर ही process करता है।
